

Atterberg limits test: liquid limit, plastic limit, and PI
How to run the Atterberg limits test (ASTM D4318 and D4943): liquid limit with the Casagrande cup, plastic limit, plasticity index, and shrinkage limit.
The Atterberg limits are the water contents at which a fine-grained soil passes from one state of consistency to the next: from solid to semisolid at the shrinkage limit, from semisolid to plastic at the plastic limit, and from plastic to liquid at the liquid limit. The Swedish chemist and agricultural scientist Albert Atterberg proposed them in 1911, and today they are the basis for classifying silts and clays.
In the lab, the liquid limit (LL) and the plastic limit (PL) are measured following ASTM D4318, which also gives the plasticity index (PI). The shrinkage limit (SL) has its own standard, ASTM D4943, which measures the volume of a dried soil pat by submerging it in water. Both standards test only the part of the soil that passes the 425 µm (No. 40) sieve. Besides classifying the soil, the limits are correlated with its compressibility, permeability, compactibility, shrink-swell behavior, and shear strength.
Atterberg limits calculator
Calculator · ASTM D4318
A is the standard's default and the more precise. B is faster, but its correlation may not hold for organic soils or soils from a marine environment.
Liquid limit
Trials at different water contents. The flow curve is drawn with the blows on a log scale and gives the limit at 25 blows.
| Trial | Blows | Container(g) | Container + wet(g) | Container + dry(g) |
|---|---|---|---|---|
| #1 | ||||
| #2 | ||||
| #3 |
Plastic limit
The thread crumbles at this water content; the valid trials are averaged.
| Trial | Container(g) | Container + wet(g) | Container + dry(g) |
|---|---|---|---|
| #1 | |||
| #2 |
Shrinkage limit
Besides the masses, the pat's volume is measured before and after drying: the shrinkage limit is the water content at which the soil stops shrinking.
Optional. The soil's water content where it lies, not the test's: with it come the liquidity and consistency indices.
With 3 trials from 19 to 32 blows, the flow curve gives LL = 38.9 % at 25 blows, reported as 39 %, with a flow index of 3.1 %. PL = 21.4 %, reported as 21 %, so the plasticity index is PI = 39 − 21 = 18 %. At 23 % natural water content, the liquidity index is 9 % and the consistency index 91 %
Atterberg limits
| Quantity | Value |
|---|---|
| Liquid limit · LLwater content at 25 blows on the flow curve, to the whole number | 39% |
| Plastic limit · PLaverage of the valid trials, to the whole number | 21% |
| Plasticity index · PILL − PL, with the whole numbers | 18% |
| Flow index · Ifthe drop in w over one log cycle | 3.1% |
| Shrinkage limit · SLw − (V₁ − V₂) / dry mass, to the whole number | 10% |
| Shrinkage ratio · Rdry mass / V₂ | 1.43 |
| Liquidity index · LI(wn − PL) / PI | 9% |
| Consistency index · CI(LL − wn) / PI | 91% |
This calculator is offered for information and technical support. It doesn't replace professional judgment or the reviews due, and its use is the user's responsibility.
The calculator also has a page of its own, to keep at hand: the Atterberg limits calculator.
What are the Atterberg limits?
A clay can be molded at some water contents and not at others. With little water, it behaves like a solid; with a lot, the soil and water flow together like a thick liquid. The Atterberg limits mark the water contents where that behavior changes. Each one is a water content expressed as a percentage of the mass of the oven-dry soil, and each comes from a test defined by convention, so a value only means something when it was measured the way the standard says.
Liquid limit
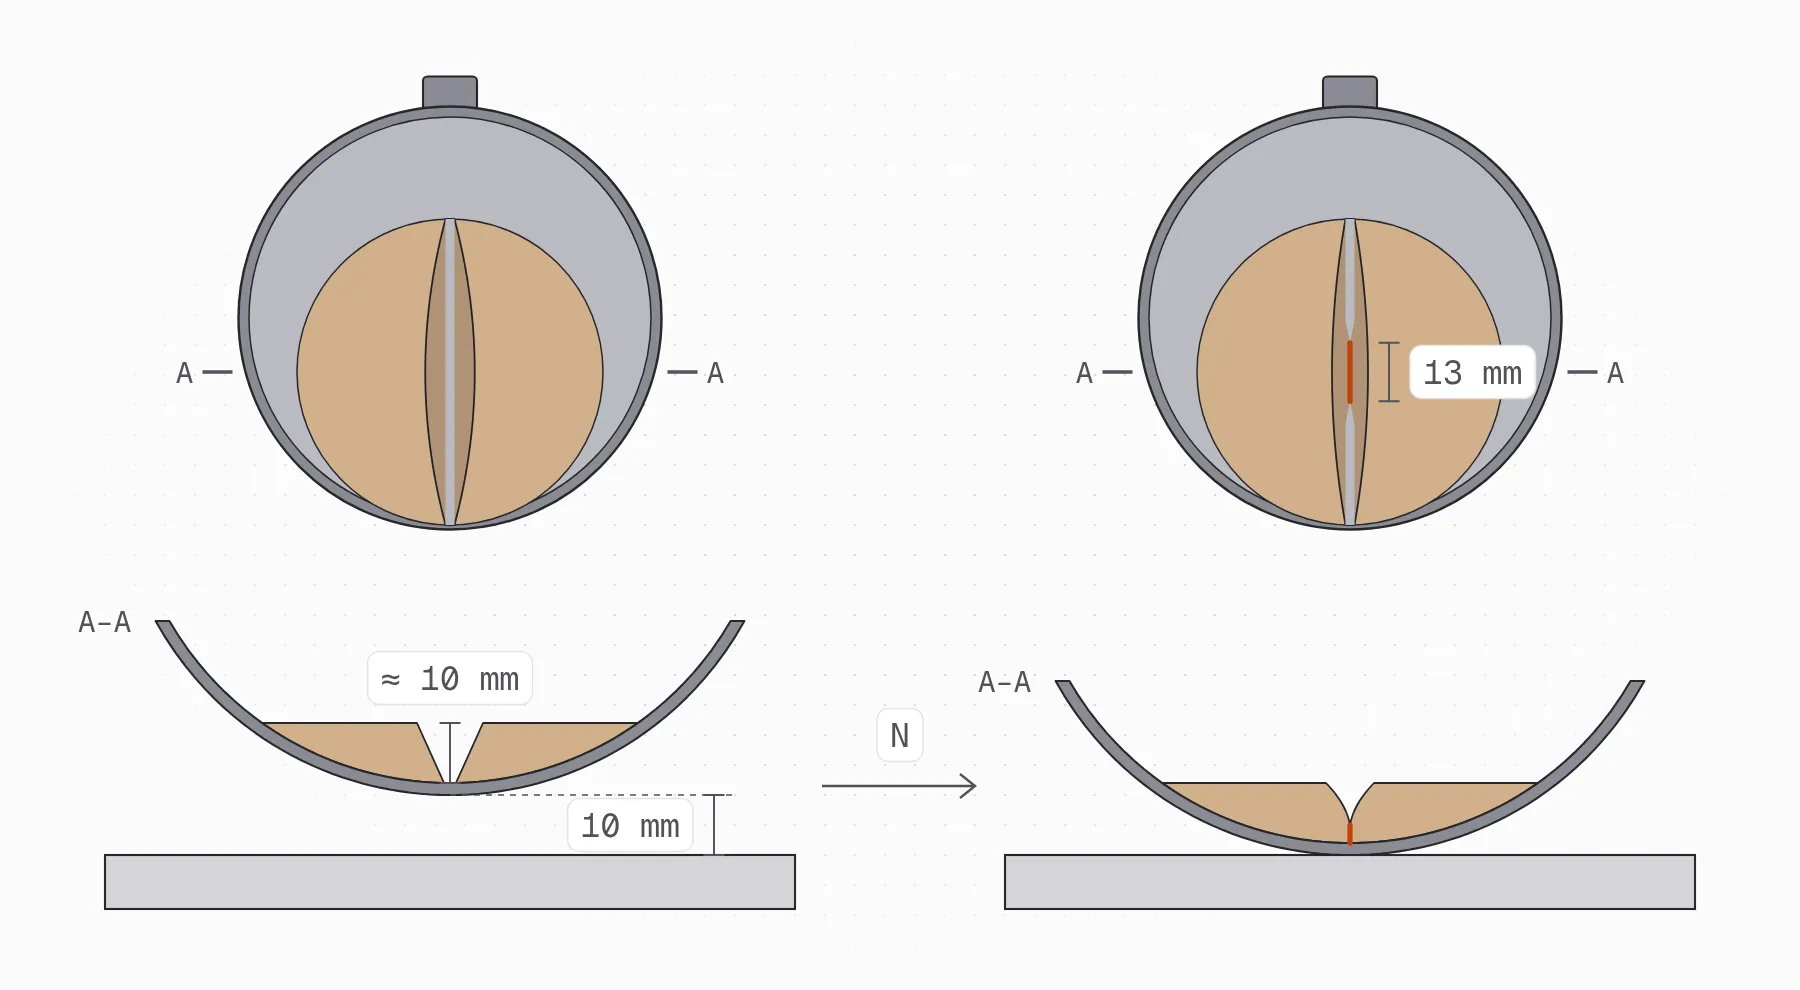
The liquid limit is the water content at which the soil passes from the plastic to the liquid state. By the ASTM D4318 convention, it is the water content at which a groove cut in a soil pat in the Casagrande cup closes along 13 mm (½ in.) after 25 drops of the cup. Since it is hard to hit 25 blows exactly, several trials are run at different water contents and the value at 25 blows is read from a line.
Plastic limit
The plastic limit is the water content at which the soil passes from the semisolid to the plastic state. It is the water content at which a thread of soil, rolled out by hand or with a rolling device, crumbles when it reaches a diameter of 3.2 mm (⅛ in.) and can no longer be rolled out again.
Shrinkage limit
The shrinkage limit is the water content below which further drying no longer reduces the volume of the soil. Above it, every gram of water that evaporates takes an equal volume with it; below it, the particles are already packed as tightly as drying can pack them, and air enters the pores instead. ASTM D4943 finds it by drying a pat of soil molded at a high water content and measuring its volume before and after.
Plasticity index and related indices
The plasticity index is the range of water contents over which the soil behaves plastically:
From the limits and the soil’s natural water content, , two more indices describe the state of the soil where it lies. The liquidity index is 0 when the soil is at its plastic limit and 1 when it is at its liquid limit; the consistency index runs the other way:
ASTM D4318 also notes that the plasticity index and the percentage of particles finer than 2 µm give the soil’s activity number, a measure of how active its clay minerals are.
Equipment
Liquid limit and plastic limit (ASTM D4318)
- Casagrande liquid limit device: a brass cup that, with its hanger, weighs 185 to 215 g, a cam that lifts the cup, and a hard rubber base. The height of drop is adjusted to 10 ± 0.2 mm. It can be turned by hand or by a motor at 2 ± 0.1 revolutions per second.
- Flat grooving tool, of plastic or noncorroding metal, with a tip 1.9 to 2.1 mm wide and 7.9 to 8.1 mm deep.
- Gage block for checking the 10 mm height of drop (it often comes on the handle of the grooving tool).
- Ground glass plate, at least 30 cm (12 in.) square and 1 cm (⅜ in.) thick, for mixing the soil and rolling the threads.
- Plastic limit rolling device (optional), with the paper that goes on its plates.
- A rod 3.2 mm in diameter to compare the threads against (optional, useful while learning).
- Spatula with a blade about 2 cm wide and 10 to 13 cm long.
- 425 µm (No. 40) sieve, 200 mm (8 in.) in diameter; a 2.00 mm (No. 10) sieve may also be needed. A washing pan to go with them.
- Mixing and storage dish that keeps the soil from losing water.
- Wash bottle with distilled or demineralized water.
- Water content containers with lids.
- Balance readable to 0.01 g.
- Oven at 110 ± 5 °C.
Shrinkage limit (ASTM D4943)
- Shrinkage dish, permanently identified, and a glass plate to determine its volume.
- Grease, to coat the dish and the glass plate.
- Microcrystalline wax, with no paraffin, and a pot to melt it in.
- A tube with a cap and a caliper, to cast a cylinder of wax and measure its density.
- Steel straightedge and spatula.
- Thread to hang the soil pat from.
- Balance readable to 0.01 g with a suspension apparatus and a water bath, to weigh the pat submerged.
- The Casagrande device, to bring the soil to the right consistency, and the oven at 110 ± 5 °C.
Preparing the specimen (ASTM D4318)
The same prepared soil is used for the liquid limit and the plastic limit. ASTM D4318 has two preparation procedures. The client or the project specifies which one; if nobody does, the wet preparation is used.
- Wet preparation (procedure 1, the default). Start from the soil at its natural water content, without drying it. Take enough to give 150 to 200 g of material passing the 425 µm (No. 40) sieve. If the soil has little coarse material, mix it with distilled water on the glass plate and remove the coarser particles by hand or by pressing the soil through the sieve. If it has a lot, soak it until the lumps soften and wash it through the 425 µm sieve, no more than 500 g at a time, and discard what stays on the sieve. Then dry the slurry toward the liquid limit, at room temperature or with warm air (the required way when the soil has soluble salts), by decanting clear water, or by filtering.
- Dry preparation (procedure 2). Only when it is specified. Dry the sample at no more than 60 °C, break up the lumps with a rubber-covered pestle so the particles themselves don’t break, and pass the fine material through the 425 µm sieve. Soak what is retained, wash its fines through the sieve, and add that wash water to the dry fines.
Either way, mix in distilled water until the soil reaches the consistency of the first trial: about 25 to 35 blows for Method A, or 20 to 30 blows for Method B. Cover it and let it stand for at least 16 hours (overnight), and remix it thoroughly just before testing. Drying changes the result: the liquid limit of a soil with a lot of organic matter drops sharply when it is oven-dried, so comparing the liquid limit before and after oven-drying is a qualitative check for organic matter.
Liquid limit procedure with the Casagrande cup (ASTM D4318)
ASTM D4318 gives two methods. Method A (multipoint) is the default and the more precise one; ASTM recommends it whenever the result may be disputed. Method B (one-point) takes less time, but it depends on the operator’s judgment, it is not recommended for inexperienced operators, and its correlation may not hold for organic soils or soils from a marine environment.
Before starting, check that the device is clean and not worn (the base, the cup, the cam, and the tip of the grooving tool) and adjust the height of drop to 10 mm with the gage.
Method A: multipoint
-
Place a portion of the prepared soil in the cup, at the point where it rests on the base. Press it down and spread it until it is about 10 mm deep at its deepest point, with a roughly horizontal surface. Use as few spatula strokes as you can and don’t trap air bubbles. Cover the soil left in the dish with a damp towel so it doesn’t dry out.
-
Cut a groove through the pat with the grooving tool, beveled edge forward, along the line joining the highest point of the rim to the lowest. Keep the tool perpendicular to the surface of the cup throughout the stroke.
-
Turn the crank at 1.9 to 2.1 drops per second until the two halves of the pat touch at the bottom of the groove along 13 mm (½ in.). Don’t hold the base with your hand while you turn the crank.
-
Check that the groove closed because the soil flowed, with both sides of similar shape. If an air bubble closed it early, reform the pat, adding a little soil to make up for what the groove removed, and repeat. If the soil slides on the cup, repeat at a higher water content.
-
Record the number of blows, . The first trial must close in 25 to 35 blows.
-
Take a slice of soil about the width of the spatula across the pat, at right angles to the groove and including the part that flowed together. Put it in a tared container, cover it, and weigh it to 0.01 g. Its water content is determined following ASTM D2216.
-
Return the soil left in the cup to the dish, and wash and dry the cup and the grooving tool.
-
Add a little distilled water to the soil, remix it, and repeat steps 1 to 7 for a second trial that closes in 20 to 30 blows and a third that closes in 15 to 25 blows. Each trial is wetter than the last and needs fewer blows. Never add dry soil to the sample once testing has started.
Method B: one-point
-
Bring the soil to a consistency that closes the groove in about 20 to 30 blows.
-
Fill the cup, cut the groove, and turn the crank exactly as in steps 1 to 4 of Method A. If the groove closes outside 20 to 30 blows, adjust the water content and start again.
-
Record and take a water content specimen across the closed groove, as in step 6 of Method A.
-
Reform the pat in the cup with soil from the dish to replace what you removed, without adding water, and repeat the groove and the blows.
-
If the second closure is within 2 blows of the first, record its and take a second water content specimen. If not, remix all the soil and start over.
Plastic limit procedure (ASTM D4318)
-
Take at least 20 g of the soil prepared for the liquid limit. If it is too wet to roll without sticking to your hands, spread and mix it on the glass plate until it can be rolled.
-
From that soil, take a portion of 1.5 to 2.0 g and shape it into an ellipsoidal mass.
-
Roll it into a thread of uniform diameter.
- By hand: roll it between your palm or fingers and the glass plate, at about 80 to 90 strokes per minute (one stroke is the hand going forward and back), until the thread reaches 3.2 mm. The rolling should take no more than 2 minutes.
- With the rolling device: place the mass on the bottom plate, lower the top plate, and move it back and forth while pressing down until the top plate touches the side rails, within 2 minutes. The thread must not touch the rails.
-
When the thread reaches 3.2 mm, break it into several pieces, squeeze them together, knead them, reform the ellipsoid, and roll again. Repeat until the thread crumbles under the pressure needed to roll it and the soil can no longer be rolled into a 3.2 mm thread. A thread that breaks into shorter pieces has not crumbled yet: roll each piece out. Don’t slow down or ease the pressure to make the thread fail at exactly 3.2 mm.
-
Put the crumbled pieces in a tared container and cover it right away.
-
Repeat steps 2 to 5 with new portions until the container holds at least 6 g of soil.
-
Repeat steps 2 to 6 to fill a second container with at least 6 g.
-
Weigh both containers to 0.01 g and determine their water contents following ASTM D2216.
Shrinkage limit procedure (ASTM D4943)
The water submersion method finds the volume of the dry pat by coating it in wax and weighing it under water. The standard’s procedure tests one pat; a teaching lab can run two or three to see how much the results scatter.
Volume of the shrinkage dish
-
Record the identification of the dish to be used in the test.
-
Determine the volume of the dish (V), which will be the volume of the wet soil pat. Lightly grease the dish and a glass plate and weigh them together; fill the dish with water until it overflows and press the plate onto it to push out the excess, with no air trapped; dry the outside and weigh again. The difference between the two weighings is the mass of the water, and that mass divided by the density of water (1.000 g/cm³) is the volume of the dish.
-
Clean the dish and the plate and repeat the determination. If the two volumes differ by more than 0.03 cm³, keep repeating until two determinations agree within that margin, and record their average as V.
Density of the wax
-
Grease the inside of the tube and cap one end.
-
Pour in melted wax and let it cool until it is solid.
-
Remove the cap, push the wax cylinder out, and square both ends with the straightedge.
-
Weigh the cylinder ().
-
Measure its height in four places and its diameter in four places, and average each ( and ).
The soil pat
-
Prepare about 150 to 200 g of soil passing the 425 µm (No. 40) sieve, by the wet or dry procedure of ASTM D4318. Add water until the soil needs about 10 blows of the Casagrande device to close the groove, let it stand covered for at least 16 hours, then remix it and adjust the water content again if it needs it.
-
Lightly grease the inside of the dish and weigh it () to 0.01 g.
-
Place soil equal to about a third of the volume of the dish in it, and tap the dish on a firm surface cushioned with a few layers of blotting paper until the soil flows to the edges.
-
Add a similar amount and tap until the soil is compacted and the trapped air has come to the surface. Keep adding and tapping until the dish is full and soil flows over the edge.
-
Strike off the excess with the straightedge, level the soil with the rim, and wipe off any soil on the outside of the dish.
-
Immediately weigh the dish with the wet soil () to 0.01 g.
-
Let the pat air-dry until its color turns from dark to light. Then check it: if it has cracked or broken, start the test over.
-
Oven-dry the pat at 110 ± 5 °C to constant mass and weigh the dish with the dry soil () to 0.01 g.
-
Take the pat out of the dish, tie a thread around it, and dip it in melted wax with one smooth, continuous motion, until the wax just covers the top. If a bubble forms in the coating, cut it out with a sharp point and fill it with wax. Keep dipping until the wax seals the soil completely.
-
Let the coated pat cool to room temperature and weigh it in air () to 0.01 g.
-
Hang it from the suspension apparatus, fully submerged in the water bath and touching neither the bottom nor the sides, and record its mass in water ().
Calculations
Water content of each container
Every liquid and plastic limit trial gives one water content, calculated as ASTM D2216 does:
Where:
- = water content of the trial (%)
- = mass of the empty container (g)
- = mass of the container with the wet soil (g)
- = mass of the container with the oven-dry soil (g)
Liquid limit, Method A: the flow curve
-
Plot each trial’s water content (arithmetic scale) against its number of blows (logarithmic scale).
-
Draw the best straight line through the three points. That line is the flow curve:
Where:
- = number of blows to close the groove
- = flow index, the drop in water content over one log cycle of blows (%)
- = the line’s water content at (%)
With two points on the line, and , the flow index is:
-
Read the water content of the line at 25 blows. That is the liquid limit; round it to the nearest whole number. The calculator fits the line by least squares and reads it at 25 blows the same way.
Liquid limit, Method B: one point
-
For each of the two water content specimens, calculate a trial liquid limit:
Where:
- = trial liquid limit (%)
- = water content of the specimen (%)
- = blows that closed the groove for that specimen
-
The liquid limit is the average of the two trial values, rounded to the nearest whole number. If they differ by more than one percentage point, the USACE laboratory manual has the test repeated.
Plastic limit
The plastic limit is the average of the water contents of the two containers, rounded to the nearest whole number.
Plasticity index
Where:
- = plasticity index
- = liquid limit, as a whole number
- = plastic limit, as a whole number
If the liquid limit or the plastic limit can’t be determined, or if the plastic limit is equal to or greater than the liquid limit, the soil is reported as nonplastic (NP). The same goes when the soil keeps sliding in the cup after several trials at higher water contents, or when the groove always closes in fewer than 25 blows: the liquid limit can’t be determined, and the plastic limit test is skipped.
Shrinkage limit
The calculations below and the symbols they use follow ASTM D4943.
-
Mass of the dry soil:
Where:
- = mass of the oven-dry soil pat (g)
- = mass of the dish with the oven-dry soil (g)
- = mass of the greased dish (g)
-
Water content of the soil when it was placed in the dish:
Where:
- = initial water content of the soil in the dish (%)
- = mass of the dish with the wet soil (g)
-
Mass of water displaced by the wax-coated pat:
Where:
- = mass of water displaced by the wax-coated pat (g)
- = mass of the wax-coated pat in air (g)
- = mass of the wax-coated pat in water (g)
-
Volume of the wax-coated pat:
Where:
- = volume of the dry pat with its wax (cm³)
- = density of water (1.000 g/cm³)
-
Density of the wax, from its cylinder:
Where:
- = density of the wax (g/cm³), to at least two significant digits
- = mass of the wax cylinder (g)
- , = average diameter and height of the wax cylinder (cm)
-
Mass and volume of the wax on the pat:
Where:
- = mass of the wax (g)
- = volume of the wax (cm³)
-
Volume of the dry pat:
Where:
- = volume of the oven-dry soil pat (cm³)
-
Shrinkage limit:
Where:
- = shrinkage limit (%), reported to the nearest whole number
- = volume of the wet soil pat, equal to the volume of the dish (cm³)
In the calculator, the wet volume is and the dry volume is .
-
Shrinkage ratio, reported to two decimal places:
With it, the standard also gives the volumetric shrinkage from a given water content (%), and the linear shrinkage, both to the nearest whole number:
What to report
For the liquid and plastic limits (ASTM D4318):
- Sample identification (project, boring, sample, depth) and a description of the soil.
- Liquid limit, plastic limit, and plasticity index, as whole numbers; NP if the soil is nonplastic.
- The liquid limit method (A or B) and the preparation procedure (wet or dry).
- An estimate of the percentage of the sample retained on the 425 µm (No. 40) sieve, and any special selection, such as removing sand lenses.
- If you have it, the natural water content and the liquidity index.
For the shrinkage limit (ASTM D4943):
- Sample identification, date, and who ran the test, with a description of the soil and any special preparation.
- Shrinkage limit and volumetric and linear shrinkage, as whole numbers, and the shrinkage ratio to two decimal places.
- The masses of the wet and dry pat, the pat with wax in air and in water, the density of the wax, and the initial volume of the soil.
Using the results
The liquid limit and the plasticity index place a fine-grained soil on the plasticity chart, which is how the Unified Soil Classification System separates silts from clays and low plasticity from high plasticity, with the boundary at a liquid limit of 50. The USCS lesson goes through it. A point above the upper limit line, , has never been found in a natural soil, so it usually points to a mistake in the calculation.
Common mistakes
- A height of drop that wasn’t checked, or worn parts: a worn spot on the base, a groove worn into the cup, or a grooving tool whose tip has worn wider than 2.1 mm.
- Soil left on the base where the cup strikes it.
- Letting the soil dry out during the test. Keep the dish covered.
- Adding dry soil to a mix that came out too wet. Let it dry on the glass plate instead.
- Testing soil that was air-dried or oven-dried when the wet preparation was asked for, or that wasn’t mixed and left to stand long enough.
- Water contents measured on too little soil, or on different balances.
- In the plastic limit, a final diameter judged by eye without the 3.2 mm rod, or stopping the rolling too soon. If you are unsure whether the thread has crumbled, roll it once more.
References
- ASTM International. ASTM D4318, Standard Test Methods for Liquid Limit, Plastic Limit, and Plasticity Index of Soils: scope and significance. https://www.astm.org/d4318-26.html
- ASTM International. ASTM D4318-00, scope (notes on the one-point method). https://store.astm.org/d4318-00.html
- ASTM International. ASTM D4943, Standard Test Method for Shrinkage Factors of Cohesive Soils by the Water Submersion Method: scope and significance. https://www.astm.org/d4943-25.html
- NICET. Performance Examination, Soils: ASTM D4318-17e1 checklist (2020). https://www.nicet.org/nicetorg/assets/file/public/performance_examination_checklists/soils/astm_d4318-17e1.pdf
- Oklahoma Department of Transportation. Procedure Checklist, ASTM D4943 Shrinkage Factors of Cohesive Soils by the Water Submersion Method (2023). https://www.odot.org/materials/C97001_WEB_REP/EVALD_CLAB_TECHS/FNL_EVAL_CLISTS/9734242405301330_00058.pdf
- U.S. Army Corps of Engineers (1970, Change 2 1986). EM 1110-2-1906, Laboratory Soils Testing, Appendices III and IIIA. https://vulcanhammer.net/wp-content/uploads/2017/01/em-1110-2-1906.pdf
- Alberta Transportation. TLT-412, Liquid Limit, Plastic Limit, and Plasticity Index of Soils (one-point method). https://alberta.ca/system/files/trans-tlt41202.pdf
- Hossain, M. S., Islam, M. A., Badhon, F. F., & Imtiaz, T. (2021). Properties and Behavior of Soil: Online Lab Manual, chapter 5, Atterberg Limit Test. Mavs Open Press, University of Texas at Arlington. https://uta.pressbooks.pub/soilmechanics/chapter/atterberg-limit-test/
- Germaine, J. T., & Germaine, A. V. (2009). Geotechnical laboratory measurements for engineers. Wiley.